Tuesday, March 31, 2009

April 2009 Menu

I wonder why I’ve been killing myself, (I haven't really), to come up with 25 or so fabulous meals each month for my family when all I really have to do is cook about every other day? I recently organized my friend Jill’s kitchen and when I do such a thing I have the pleasure of bonding with someone over a 5 hour period of laborious tasks. Unfortunately for my friend-clients, they must also spend that time putting up with me and my opinions about everything in the world that doesn’t really matter in relation to their kitchen. Anyhoo, my wise friend Jill told me that they only cook a dinner every couple of days and then they eat leftovers. This idea has sat with me for a couple of weeks now. WHY am I not doing this also? I think partially because I just love food and always have so many new recipes that I want to try. I am also in a habit of torturing, (it’s not really torture it’s a “learning” experience), my children by placing dinners that are healthy for their growing bodies in front of them regardless whether or not they like the meal. I think that having the same meal 2 days in a row that they don’t like lowers their chances of enjoying meal time but, regardless, we are giving it a try. Here is the absolute most simple month I have ever done. It just doesn’t seem right, but I’m going to cook more of every meal to make sure we get a leftover meal out of each one (aside from pizza and the occasional meal taken from the freezer). We'll see how it goes.

Oh and I forgot to add April's in-season produce to the top of my menu for shopping purposes. I will do that now . . . .

Recipes to Accompany April 2009 Menu

2nd: Thai Shrimp Soup w/ Lime & Cilantro (Southbeach Recipe)

4th: Bloody Mary Flank w/ mashed potatoes, gravy & veggie (thanks to Kristin D for passing this along)


6th: Poppy Turkey
This is fabulous. I realize that the ingredients sound weird but it is delicious I promise! It's from a freezer friendly cookbook called "Once A Month Cooking," which is definitely worth checking out.


8th: Calzones or Pizza with Salad (whichever I feel like making that night)


9th: Shrimp & veggie Thai Curry over rice

For this I just loosely follow a recipe on the jar of red curry paste. Use any veggies you like. I use onion, carrots, peppers, zucchini and sometimes mushrooms and always peas (but add frozen peas at the end).S o what I do is throw in some Olive oil in the pan and let it heat up, then spoon approx 1 ½ T of curry paste till fragrant. Then add your veggies in cooking order then add a can of coconut oil and some chicken broth or clam juice. Stir 1 T corn starch w/ 1 T chicken broth (clam juice if using) and add to thicken. Sometimes I add a can of diced tomatoes. Peas and shrimp at the end. Serve over rice. It’s a general recipe and it’s different every time but that’s about how I make it. I have purchased red curry paste in a large can at the Asian market and I just freeze the remaining paste in ice cube trays and then put into a freezer bag for later use. The jar that you can purchase at Giant Eagle is fine to just keep in the jar at room temp for several months.

*FYI: Trader Joes has the best price on coconut milk @ .99 cents/can.


11th: Taco Soup w/ cheese quesadillas

12th: Cranberry Pork Roast in the crock w/ side veggie & rice

15th: Momwiches w/ fried & salad

16: Cornmeal crusted fish fillets w/ side veggie & pesto pasta

18th: BBQ Flank Steak over salad w/ corn bread

20th: TGI Friday Spicy Cajun Chicken Pasta (thanks mom)

10 ounces cooked fettuccine (cooked al dente)

1 cup Spicy Cajun Pasta Sauce (recipe follows)

1 tablespoon Parmesan cheese

1 boneless chicken breast, cooked and sliced in strips

1 teaspoon chopped parsley

Spicy Cajun Pasta Sauce:

2 ounces olive oil

1 tablespoon fresh chopped garlic

1/2 cup onion, cut in large chunks

1/2 cup green peppers, diced in large pieces

1/2 cup red peppers, diced in large pieces

1/8 teaspoon cayenne pepper

1 cup chicken stock

1 cup V-8 juice

cornstarch (mix about a table spoon with a couple table spoons coldwater to form a slurry)

salt and pepper to taste

1. Prepare sauce: Heat oil in saute pan; add garlic; saute for 30seconds; add onions and saute for 1 minute; add peppers andcontinue to saute for another minute. Deglaze with chicken stockand reduce to half. Add V-8 juice and cayenne pepper; bring toboil; simmer 10 minutes.2. Thicken to consistency with cornstarch; season to taste withsalt and pepper.3. Add cooked pasta to sauce and heat through until hot.4. Arrange on serving dish and top with chicken breast. Sprinklewith Parmesan and parsley.

Serves 2 to 4

22nd: Pizza w/ pepperoni & Salad (homemade as usual)

23rd: Classic Minestrone Soup w/ hearty bread

25th: Meatloaf w/ mashed potatoes & veggie


27th: Chicken Paprika w/ salad
30th: 3 Bean Chili w/ corn bread


Saturday, March 28, 2009

Get Your Spices Cheap & Save Loads of Money

Do you ever visit a country store that has flour, oats and spices priced crazy cheap? Have you ever sat in front of the spice bins wishing you remembered which spices you were running low on? I have and then I kicked myself for wasting the trip because I could have used quite a few spices and things and I would have saved some bucks if I had only known what I needed. Now we visit the same country store every Autumn for apple picking so I plan my visits more wisely. My mother also happens to frequent some country stores so I keep a list of the items that those stores carry. (They thankfully keep such a list). If I can’t make my annual trip Mom will pick up some things for me when she goes to her stores.

It is a mystery to me how or why these country stores sell their herbs and spices so inexpensively. However they do it, you should take advantage. I keep quite a number of spices since I am a frequent cook and I like to explore new recipes. I keep the little store size jars in my cupboard for easy access and a bin in my basement pantry for the overflow. In my overflow spice bin I keep a list for my annual country store trip. So when I go to refill a store size jar in my kitchen with my overflow bin and I see that something is running low I add it to my annual shopping list. It is easy to do and it saves a ton of money since I cook a lot.

Here are some examples of the savings I have experienced over the last few years. I have this rather large bag of bay leaves that cost 72 cents at the country store but a store size jar which would be about ¼ of the amount costs around $5 at the grocery. There is also a 1 lb bag of sesame seeds which cost $1.33 but the jar you get at the grocery store holds a measly 2.25 oz (there are 16 oz in 1 lb) and costs around $5. This could easily become a quantifiable category for the “Things I didn’t Buy” savings envelope.

Friday, March 27, 2009

Turn Room Clutter into Fabulous Closet Shelving

Do you have a little book case or old shelves sitting with “stuff” on it making your room feel cluttered? My son had one in his bedroom with his banks on it, some Leggos and miscellaneous books that never stayed neat. By moving the shelving unit into his closet we uncluttered his room instantly. It made such a huge difference in the feel of his room that I am convinced that nearly all open shelving units in a room should be abolished. Of course, I am not into “stuff” or displaying “stuff.” The feel of an uncluttered stuff-less room makes me breathe easier. But let’s face it, we all have stuff whether we want to have stuff or not. So try moving your stuff to a shelving unit inside a closet. Don’t have closet room to spare, you say? You’d be surprised at how much more storage real estate you can gain on shelves in a closet as opposed to empty hanging air space. If you have such a situation, try it out and see how much harder your shelves can work for you when they are hiding inside a closet as opposed to being out in the open and having to look pretty.

Thursday, March 26, 2009

It's Springtime! Get your Garage Sale List together!


There are several things that came up in conversation over the Winter that my kids or I would like to have that are clearly garage sale purchases. For instance, my son wants a soccer net. Now, I can imagine that a lot of soccer nets may get torn or broken before they are discarded. I can also imagine that a well built soccer net that has survived a kid or two would be just the kind of cumbersome thing someone would like to unload at a garage sale. There are several of these kinds of things that have come up over Winter which have inspired another one of my many lists. I love lists. They keep me focused, remind and applaud me when entries are crossed off. So, anywho, I made up a Garage Sale list for 2009 just to get us excited for Springtime Garage Sale season. If you keep a Garage Sale lookout list you can share it with other garage saling friends. You may find that someone you share your list with has something on your list that they want to dispose of. For instance, my mom seems to spot things that I am looking for rather quickly (sometimes in her basement!). For some items, you have to tell everyone you know and be patient. There have been two such items that I waited nearly two seasons for before I landed them one of which was an upright freezer. I scored it for $50 and it was only 3 years old! The other was a bike trailer. I told everyone I knew about my desire for a bike trailer. Right about when I was going to give up and pay retail I finally found one right down the street. Now the part where my husband backed the van over the beloved bike trailer is another story. So if you see another bike trailer out there, I am on the hunt again. Ugh!


In case I get lucky with any of my readers, here is my current list. I haven't browsed Craigs List or FreeCycle.com lately so maybe I'll get lucky there?


Garage Sale 2009 List

Hamburger press/maker/shaper
Garlic Press – preferably pampered chef
Pasta maker
Pastry/Pasta roller for ravioli edges
Cake décor tools
Attachments for kitchen aid mixer

Girly Bedroom Lamp
Girly Trash Can
White/floral vintage curtains for girly room

Soccer net for backyard

Always:
Picture frames – black, white & silver 11x14 and bigger
Gift wrap & bows
Girly hair accessories
Kids clothes/snow suits/boots/etc
Picnic table - large with attached bench (octagon preferably but any kind)
Yard tools (rakes, shovels, bulb planter, hand shovels, etc)

Wednesday, March 25, 2009

Art Management 101


Young children come home from school, Sunday school, and other places with wonderful art projects they've made. We have a craft area for the kids so they can create many masterpieces right at home. I really appreciate the words of advice that our preschool gave with regard to appreciating their masterpieces: Don’t ask what it is, instead ask them to tell you about it. Luckily I got that advice pretty early on in my mothering career so I haven’t made too many of those “what is THIS?” blunders when I should have known that it was an airplane or a self portrait or whatever. Even though I get great explanations about the artwork that enters my house, I can not be the only one guilty of thinking “WHERE am I going to put this?” when praising my child on the 24”x36” poster about God creating the world that they made in Sunday school. I have some rules of thumb to prevent my kids’ artwork from cluttering up my house.

1) If it is mostly school-made and not child-made it goes in the trash the evening of the same day it entered the house
a. “school-made” means that the school printed out, cut out or laid out all the parts and the child merely put them together in the manner they were instructed leaving no creative expression from the child
b. “Child-made” means that the idea or creative spin on the project came from the child rather than specifically guided instructions from someone else.
2) There must be a clearly defined area for artwork to be displayed, (usually a door, a framed bulletin board or some other clearly defined area), and that area is NOT the refrigerator!

3) Coloring pages get bottom priority to all other child-made projects and should not occupy more than 50% of the designated art display area.

4) Artwork must be rotated as it comes in so that it does not spill outside the designated art display area.
a. “Rotation” means that one artwork finds the trash as another artwork finds a place on the designated art display area
b. Should artwork appear that you do not want to find the trashcan but has overstayed its welcome, (beyond 3 months or out of season), see rule 6), 7) or 8).
5) One piece of artwork is not to overlap another. (This keeps the designated art display area from becoming cluttered and it truly shows off the pieces that are there.)

6) If it is something truly wonderful that we want around for a long time it gets a frame and is placed somewhere in the house.

7) If the artwork is of construction paper size or smaller and is very special we may place it in the posterity box or with the seasonal decorations if it is seasonal so it can be displayed annually.

8) If the artwork is something that we do not want in a frame or can not frame due to the size/shape/construction then we will take a digital photo of it (or scan it) before disposing of it and once we have several pictures of various art pieces we will order an art photo book of the pictures for each child/artist.

9) If the work of art is something that can not be taped or pinned to the designated art display area it may sit on the counter for the remainder of the day that it arrived and if the child does not want to part with it they may keep it in their room until their little brother destroys it or I find it trampled on the floor somewhere or it is no longer coveted and I can safely dispose of it.

My kids are not aware of these “rules” and this is the first time I have ever written them. These guidelines that I have implemented really do keep the peace and keep order in our house. The quantity of artwork that will enter this house could easily fill several rooms in our house by the time they graduate high school if I didn’t have some sort of artwork storage/display system. These rules also help to alleviate the mother’s guilt that often accompanies disposing of artwork.
P.S. The picture of Mary with baby Jesus above is in a frame in our living room. Decorating your home with your children's artwork can be both special and frugal.

Tuesday, March 24, 2009

Frugal Habits – Skip the Juice, Eat the Fruit

We all know that juice is packed with calories. I haven’t come across too many parents who give their kids free reign with regard to juice intake. Juice that is truly juice, 100% fruit juice, has many health benefits as evidenced by the nutrition label on the container with all the vitamins. Juice comes from fruit so what is the harm? It is a processed food that strips away the fiber from a fruit. It is also expensive, (as are all processed foods that claim to be “healthy”). Eating the fruit that juice is made from is much more beneficial than consuming just the juice from the same fruit and it is usually less expensive. I know that someone reading this wants to bring up the fact that some juices are fortified with additional vitamins. If you aren’t eating a well-rounded diet that provides all of your required daily vitamins perhaps your doctor will provide you with a script for a vitamin, (cheaper than over the counter vitamins), otherwise just eat a healthy well-rounded diet of whole foods with natural fibers that will satisfy your hunger without excessive calorie intake (yea, sure, says the sugar addict) and save some bucks on unnecessary juice.

Do my kids drink juice you ask? Sometimes they have orange juice with their breakfast but otherwise we do not buy any other juice keeping the grocery bill down and fruit consumption up. On top of that, juice is a special treat to my kids and is much more appreciated that way.

Monday, March 23, 2009

Keep your Hand Towels Off the Floor

If your kids are like my kids and every other kid that visits my house, they find it impossible to keep a hand towel off the floor. They just can not do it. So rather than fight them about it just clip the towel on the towel bar with a large binder clip underneath.


Or have a knitting relative make these button towels for you:

Sunday, March 22, 2009

Blarney Rice


Sometimes a new recipe sounds like a good idea when placed on the menu weeks in advance but when the time comes to putting it together I sometimes have second thoughts. This happened last Friday when my in-laws were visiting and I wanted to try a new split-pea-over-rice recipe. I had originally come across the recipe in search of looking for ways to use up my pantry items. I was also looking for a gluten free recipe for my mother-in-law. This recipe fit the bill so I put it on our menu. On Friday, the thought of having split-pea-over rice did not sound appealing but then I also felt that it may be wrong to serve such goup to my in-laws but I did it anyway. I decided to cook some flounder on the side so we would have something in our bellies should the green goup not work out. Surprisingly we all liked it . . . well, at least 1 out of 3 kids and 4 adults. So I thought it would be nice to brainstorm a better name for it since I could only think of it as split-pea goup. We decided to adopt my father-in-law’s “Blarney Rice” idea since it was green and rather close to Saint Patrick’s day. I don’t think we’ll have this dish once a week or anything but it was super cheap, pretty tasty, quick to throw together and healthy so we’ll see it repeated in this house even if it isn’t 'til next Saint Patrick’s Day.

Tuesday, March 17, 2009

Organize a Kid’s Birthday Party


I have held 4 or 5 at-home birthday parties for my kids, (or perhaps more but I have chosen to block out the memories). I think I may finally have it down to a science. When I leave too much left unplanned things can get a little crazy especially with 10 six and seven year olds dressed in Star Wars costumes, sporting their best light saber moves. Parties are usually 2 hours long and on a couple occasions I have said to my husband, “Only 1 hour and 20 minutes left”, and soon after, “Only 1 hour left, Honey. We can do it!” So, this past weekend I believe I have conquered the at-home birthday party challenge. I put together a party agenda and printed two copies. I taped up a copy in each location where we would be sure to see it so we could refer to the agenda at any time. In the past, I had an idea of which games and things we would do but didn’t necessarily have the location and order of things figured out thinking it was best to see how the party was going first before deciding. I had good intentions but with a load of young kids filling the house and my mind with loud noises I could barely think about what to do next. But, for this last party, I had the order of events figured out exactly how and when we would do them and it was a lot of fun. I had to look at the clock only to make sure we would have enough time to fit it all in, not to see how much longer we had to endure. The kids and adults had a blast.

An at-home party is classic. There is nothing like it. And it is super cheap, if you don’t get sucked into spending money on unnecessary things. Kids, (at least mine), love having a gaggle of friends over to their house to celebrate. With all the friends and talk and games, no one is going to notice that you are using white paper plates and napkins instead of fancy princess ones that get thrown out any way. The games cost only some parental guidance, creativity and energy, (which can be easily accessed with caffeine). Noone wants those junky little party favors that end up trashing up people’s homes until they break or get thrown away. Heck, using Evite for your invitations is not only “green” but also free. I do, however, use real cards for thank you notes but those can be purchased rather inexpensively.

Here is the agenda that worked for us: If planning an at-home party scares you, just think it out ahead of time and organize an agenda to pull it off smoothly. Also, you will be glad you saved yourself loads of money!

Princess Party Agenda

1) Eat Pancakes & Apple Juice (upstairs)
2) Introduce yourself and Name Your Favorite Princess/Hero & Why while eating Pancakes
3) Princess Story Time (living room)
4) Pin the Crown on the Princess (basement)
5) Dance Party music (basement)
6) Musical Thrones and/or Pass the Princess Slipper (basement)
7) Steal the Slipper or Queen/King Says (living room)
8) Cake (dining room)
9) Presents (living room)
10) Easter Egg Hunt (basement) -- (at birthday girl's request)
11) Guess how many candy eggs are in the jar while parents arrive.
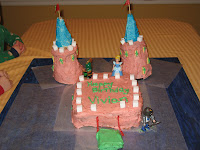
Oh and here is a picture of the castle cake I made just to give you a good laugh!

Friday, March 6, 2009

Homemade Ravioli

I should have written about the Ravioli we had last week. It was the first time I have ever attempted homemade pasta and I am proud to report that it was a huge hit. Having a picture in my head of the kids helping me roll out the dough and crimping the edges together that didn't happen is probably one of the reasons I wasn't so excited to write about it. The kids' disinterest in helping me in the kitchen is rare so that was a bit of a disappointment. I didn't take any pictures because, to be honest, the ravioli weren't pretty but they were delicious. Everyone loved them so much, (after getting past apperances), that I am certain that the next time I say we're going to make ravioli they will come running with excitement to help me.

Making the ravioli wasn't nearly as difficult as I had suspected it would be but that's really because I used my handy food processor. It isn't traditional or perhaps authentic but it worked. Rolling the dough out was a bit of a challenge because the dough was rather tough but it was not as difficult as I had imagined. The rest was pretty much a breeze. I made the ravioli one day ahead and put them in an airtight container separating them with waxed paper. I lost one or two ravioli because they adhered to the waxed paper with such a vengence that they tore apart when I tried to pry them off. I boiled them in two batches and for the second batch I just plopped them into the boiling water, paper and all, and they eventually boiled off the paper. I don't know how to store them next time between the prep work and boiling process, (suggestions will be appreciated), but I do know that we will be making it again soon.

I loosely followed these recipes: http://www.recipezaar.com/Homemade-Pasta-3474 & http://www.recipezaar.com/Homemade-Ravioli-with-Tomato-Sauce-58226

Wednesday, March 4, 2009

Consolidate Your Grocery Bags!

I just made this handy dandy grocery bag holder and I am quite pleased with it. I used to have all my grocery bags stuffed on a bottom kitchen cupboard shelf which was fine but they took up the entire shelf. So, I took one of those plastic Cascade Capsule boxes that you get at Sam’s, Costco or BJs., turned it upside down and cut a hole in it. I taped around the hole so the jagged edge from my not-so-smooth cutting did not rip the bags as I pulled them out. Then I filled the box with my grocery bags using the little door on top where you get your capsules out. Check it out. It holds plenty of bags and takes up minimal space. I also just happen to like anything square in shape. Round containers waste so much space. Ahh, it’s nice to live a simple life where the little things can make you so happy.

This could also be done using a plastic coffee can or a coffee can with a plastic lid or an oatmeal container or, well, just about anything. First consider the shelf space that you want your bag container to fit and then start thinking of your recyclables that would work in that space.

Monday, March 2, 2009

Top 10 Reasons Why Cooking and Baking from Scratch is Superior to Eating Food made from Boxes and Mixes:

10) Contrary to what you may think, cooking and baking from scratch really is as easy as making it from a box

9) It is more time consuming to research the harmful effects of those big artificial ingredients on a box than to just mix it yourself

8) Scratch cooking tastes better once you cut your taste buds off from the processed food wagon

7) It has been predicted that our generation, (30s/40s), and those born after us will NOT outlive our elders – why do you think this is?

6) You will consume significantly less sodium eating homemade foods than boxed/processed and that will make your heart happy

5) Foods that come from real plants and animals are more nutricious than man-made non-pronounceable ingredients

4) You can drop an expensive vitamin habit by getting all your vitamins and minerals from eating homemade food

3) Cooking/baking from scratch is almost always less expensive

2) To teach your children to cook healthy nutritious food is to give them lifelong tools for living a long healthy life

And the Number 1 Reason That Cooking and Baking from Scratch is Superior to Eating Food from Boxes and Mixes (drum roll)

1) Homemade/scratch food is made with love

Stop Renting your Wardrobe

I have been washing and ironing my husband’s work shirts for 5 ½ years now (gasp!) and was interested to hear, on the radio the other day, that stay-at-home moms are getting hit with cutbacks by having to iron the family’s clothing rather than sending them to the drycleaner. I had to laugh at the horrible lives of these stay-at-home mothers ironing for the first time in years. More evidence of how spoiled middle-class Americans really are for the comment to have even been made.

When purchasing new clothing I always skip over things that must be dry cleaned. That’s right, ALWAYS, with the small exception of business suits. If you are paying to have your clothes dry cleaned you will be paying more in the long run to keep them than you paid to buy them. I see it as rental wear and I refuse to “rent” my clothes. Due to the available fabrics years ago, our garment choices were limited and if you were a working professional, dry cleaning was a necessary evil. Now, there are so many alternatives to the dry-clean-only fabrics, (aside from the traditional suit which seems to be reserved for interviews only these days) that there is no “need” for such things in our wardrobes. Sometimes I wish I had a wasteful habit like regular dry cleaning so that I would have a way to save some money to put to better use..